Hello, in part 1 we learnt how to do base stitch of Ratha design. Now lets start with filling stitch of Ratha design. Just follow the below pictures. As usual come out just below point 1. If you observe, while doing base stitch part 1, path follows from left side of design to downwards, but here while doing filling stitch path follows from left side of design to upwards.
While ending try to end exactly at the starting point of filling stitch.
Have a look at finished part 1 of filling stitch. Second part of filling stitch covers the left out area in the design.
High alter, watch carefully, in base stitch part 2 instruction chart, observe point 1, so just below point 1 start part 2 filling stitch as shown in picture ( orange colour thread). Come out at point 1 (little below point 1).
Now pass needle under the base stitch thread ( black colour in the picture). Don't get confused, why colour change? In above picture i have used orange and below one purple. That's because , i was so eager to finish this filling stitch tutorial, i did small mistake, you can see it in next picture, i did not pass needle under base stitch. So while starting your part 2 filling stitch, do pass your needle under the base stitch.
In above collage picture, observe pictures 1-5, so by the time you finish your filling stitch till picture 5, an L shape of filling stitch is complete ie among 4 sides of design two sides of filling is complete giving L shape look. So in the same way try to finish rest of two sides of design. Pictures 6-9 shows finishing of filling stitch.
Finish exactly at same point where you started your part 2 filling stitch.
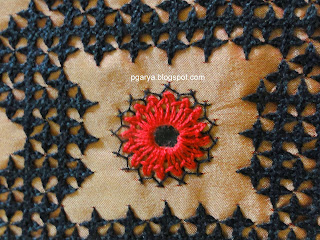
Lets see application of Ratha design, it may be used on sarees as motifs, on a table cloth, single motif can be framed with little bit of mirror work. Well i did a pouch !!!!!
Just added single mirror work, this mirror work is done using chemanthi stitch and around it herringbone stitch at one end and open cretan at other end.
Hope you all enjoyed this tutorial.
 |
| Filling stitch 1, Ratha design |
 |
| Filling stitch 2, Ratha design |
 |
| Filling stitch 3, Ratha design |
 |
| Filling stitch 4, Ratha design |
 |
| Filling stitch 5, Ratha design |
 |
| Filling stitch 6, Ratha design |
 |
| Filling stitch 7, Ratha design |
While ending try to end exactly at the starting point of filling stitch.
Have a look at finished part 1 of filling stitch. Second part of filling stitch covers the left out area in the design.
 |
| Finished part 1 of filling stitch , Ratha design |
High alter, watch carefully, in base stitch part 2 instruction chart, observe point 1, so just below point 1 start part 2 filling stitch as shown in picture ( orange colour thread). Come out at point 1 (little below point 1).
 |
| Filling stitch part 2, Ratha design |
Now pass needle under the base stitch thread ( black colour in the picture). Don't get confused, why colour change? In above picture i have used orange and below one purple. That's because , i was so eager to finish this filling stitch tutorial, i did small mistake, you can see it in next picture, i did not pass needle under base stitch. So while starting your part 2 filling stitch, do pass your needle under the base stitch.
 |
| Part 2 filling stitch, Ratha design |
 |
| Part 2 filling stitch 1, Ratha design |
 |
| Part 2 filling stitch 2, Ratha design |
 |
| Part 2 filling stitch 3, Ratha design |
 |
| Part 2 filling stitch 4, Ratha design |
In above collage picture, observe pictures 1-5, so by the time you finish your filling stitch till picture 5, an L shape of filling stitch is complete ie among 4 sides of design two sides of filling is complete giving L shape look. So in the same way try to finish rest of two sides of design. Pictures 6-9 shows finishing of filling stitch.
 |
| Finishing of part 2 filling stitch , Ratha design |
Finish exactly at same point where you started your part 2 filling stitch.
 |
| Finished part 2 of filling stitch, Ratha design |
 |
| Ratha design kutch work |
Lets see application of Ratha design, it may be used on sarees as motifs, on a table cloth, single motif can be framed with little bit of mirror work. Well i did a pouch !!!!!
 |
| Ratha Kutch Work Pouch |
Just added single mirror work, this mirror work is done using chemanthi stitch and around it herringbone stitch at one end and open cretan at other end.
 |
| Mirror work done using chemanthi stitch, Ratha kutch work |
Hope you all enjoyed this tutorial.

.JPG)

Thanks, Preethi. I was very inspired by your tutorial. I have got the design traced on a saree and am about to start the kutch work. Pls continue the good work you have started...
ReplyDeleteMeena K
Thanks for the complex motif tutorial. I have done Kutch work but was looking for a big motif. I'll try and post the pic once done.
ReplyDeleteThank u Sangheetha, all the best. Pls do share ur work, once done.
Delete