Nov 24, 2013

Hand Pleating Technique to Smock

           
                     Smocking is a form of surface embroidery worked around pleated fabric. Uniformity of  the gathering (pleats) is most important. Ways to form uniform and evenly spaced pleats are dot transfer method, gathering pleats on dotted swiss fabric, gathering the pleats on striped fabric, gathering pleats on gingham fabric. While using checked (gingham) or striped materials, dots are not necessary as the pattern can be used as a guide for the gathering . In case of stripes, horizontal lines have to be ruled on the back of the material in order to keep the rows straight.


Stripe Fabric

Working example with stripe fabric

Working example with Swiss dot fabric

Swiss Dot fabric

Gingham ( checked ) fabric

Working example with Gingham fabric

       Dot Transfer Method Pleating Instruction:


                All smocking dots should be transferred to the wrong side of the fabric.


Instead of dots , its boxed 

Working example with boxed 


                        Pick few threads of  fabric at intersection of two ( vertical and horizontal) lines as shown in above picture.


Pleating with Dot transfer method

                  While working with dot method, work a thread along each row of dots on the wrong side of fabric picking small amount of  fabric at each dot (as shown in above picture). Start with a knot or a back stitch and use a separate thread for each row, leaving generous length of  thread hanging at the end


Pleating example


                     Once all rows are picked, gently pull hanging threads to form uniform pleats. The gathering threads not only holds pleats together but also provides guidelines (straight line guideline)  while working smocking stitches.


Pleated fabric

                  Knotting gathering threads is important, knot two threads as shown in below picture.

Knotting example of  pleated  threads

              Dot transfer tips: While arranging dots,if  the width of columns is 1 cm then the length of rows to be 1.2 cm. This gives more clarity to smocked stitches than the square ones.


Dot transfer instruction

                Material Calculation:


                        The amount of fabric required varies from fabric to fabric, fine fabric like silks takes more material than the thick cotton fabric and also every individual  work with different tension, some will pull stitches more tightly than others. Average is to take at least three times the amount of required material. The stitches used to smock  make a difference too, as some are more elastic than others.


                         So before starting with a project , test sample is important. To pleat a test sample, cut a sample fabric of 8 cm * 40 cm wide. Pleat this sample and tie off  hanging threads with pleats almost touching each other. Now measure the width of pleated sample. For example, if it measures 10 cm, then divide the original width with finished width ie 40/10=4. So by this its gives a ratio of 1:4. So to determine the required amount of fabric, multiply the required width with 4, for example, if required finished width is 40 cm, then multiply 40*4=160, so fabric width should be 160 cm . Keep extra 10 cm ie 5 cm on either side. 

Nov 18, 2013

Macrame with Dorset Button 2

     In my previous post we learnt to make Dorset button. Now lets learn to make Mandala flower around Dorset button using macrame knots. To work Mandala flower we need 7 different colored threads , each measuring around 30 cm.


Lark's Head Knot
                   

                        Once laying done around Dorset button and before ribbed spider web stitch, we need to add petals to flower using Lark's Head knot. Observing above picture, add petals around button as shown in below pictures.


Adding petals using Lark's head knot


Lark's head knot


Lark's head knot


                       Gently push the knot towards ring and it should be firm. Same way finish rest of seven petals. Across each spoke you find gap, so at every gap add one one petal, overall you get eight petals.


Eight petals added using Lark's head knot

 
                           After adding all petals base, then work ribbed spider web stitch inside the wheel.


Pin with paper clip


                        Before starting with macrame knot, pin 7 petal threads and leaving one petal thread to work.


Simple knot


                     Now start adding 6 different colored thread as shown in picture.


Six different colored threads 


                        After adding all six different colors, gently push all knots towards ring as shown in below picture using your thumb finger.


Gently push towards ring


                   Now work " Double Half Hitch knot ", on orange thread.


Double Half  Hitch Knot (left side)


                       To work double half hitch knot, keep left orange thread straight and firm, move right orange thread as shown in above and below picture. Once you wrap right thread around left thread, keep left orange thread firm, straight and then pull right orange thread gently towards right side. Knot formed should be firm.


Double Half  Hitch knot


                    To work on, pick first thread, here its brown thread.


Working Mandala flower


Double Half  Hitch knot (right side)


                  Work double half  hitch knot using brown thread on orange thread as shown in below picture. In above picture you can see how to work double half hitch knot from right side. While working right side of knot, keeping orange thread straight and firm, pull gently brown thread towards left side.


                     Note    To work left side of threads follow DHH knot (left side ) picture and to work right side of threads follow DHH knot (right side) picture.


Double half hitch knot


                     Follow below picture , work DHH knot between two brown threads.


Double half hitch knot


                      Once finished working DHH knot using brown thread, then move on to pink thread, which is next first thread after brown thread.


Double Half  Hitch knot


                      Once DHH knot is worked on orange thread, then work on brown thread and lastly work on, between two pink threads as shown in below pictures.


Double Half Hitch knot


Double Half  Hitch knot


                  After pink thread is done, then start with grey thread which is next first thread after pink thread. In the same way work with rest of different colored threads.


                        After finishing single petal, work in same way for rest of  7 petals around dorset button.


Single petal using macrame knot


                    Let me share shades number which i used in below picture project. I used Anchor threads  ( six strands) because of its vibrant colors. You can also use wool or variety of cords are available in market. Basically the thickness of thread should be of a wool.


                 Shade numbers:-

                                           269,923,246,316,1089,410 and 134.

                 
                 For Dorset button , buttonhole stitch and laying is worked with 269 shade. Ribbed spider web stitch is worked with Blue (134) first and then with orange(316). Shade numbers working order for single petal is 923,246,316,1089,410,134. In this project i have worked alternate pattern, ie for one petal shade numbers order as mentioned above and for next petal its reverse way of mentioned shade numbers order starting with blue (134).


Mandala flower using macrame knots


                      Endless application of this pattern, can be used as accessory. In below picture, i have used bargello net, try to end each thread taking it backside. Once done, fill rest of area with light single color, then it can be laminated and used as coffee or glass mat.


                             Or single petal can be used as key chains.....


                            Or you can accessorize to a zip end as shown in below picture. Here i made small Chinese knot.


                      As i mentioned this pattern's application is endless you can also make wind chime by adding small bells to ends. Whats your way of using this pattern  !!!!!!!!!!!!

Nov 17, 2013

Macrame with Dorset Button

             Macrame is believed to be a form of textile making using different types of knots rather than weaving. Where as Chinese knot is decorative traditional knot began as handicraft art. Both are basically knots yet unique in their own way.


 Macrame with Dorset Button


                       This pattern in above picture is also called as " Mandala Flower ".  But to this i added Dorset button in center.


                        Dorset button are handmade buttons which became international business, but gradually declined as machine made buttons were introduced .


                       To make basic Dorset button, we require rings. It may be plastic, metal or wood. I have used plastic ring having diameter 1.5 cm.


Rings to make buttons


                       To start with, firstly start with casting the ring. I have used three strands of thread for casting. Tie a knot on ring as shown in below picture.


Casting a ring


                       Next work buttonhole stitch very closely around ring, make sure loops formed while working buttonhole stitch are facing inside ring as shown in below picture.


Casting with Buttonhole stitch


                    Finished casting using buttonhole stitch.


Casting using buttonhole stitch


                        Once casting is done around ring, next comes laying. Laying means, spokes to be added around ring as shown in below picture which looks like a wheel.


  Laying


              Once laying is complete, work Ribbed Spider Web stitch around spokes as shown in below picture. Ribbed spider web stitch is like back stitch. Come out at center of spokes as shown in picture.
After half done, i have changed colour from orange to green.


Ribbed Spider Web stitch


                 Dorset button is ready !!!! After finishing Dorset button, Mandala flower is worked around this button.


Dorset button 

       
                             Keep watching for next post on macrame flower around dorset button.


Nov 5, 2013

Chikankari V/S Applique

            Hi we talked little bit on chikankari embroidery in my earlier post " Introduction on chikankari".
As mentioned chikankari is not just herringbone stitch done from backside of fabric, apart from having around 30 unique stitches in chikan, it also has badla/mukaish work, jali work, kamdani, applique work.


            In some of lucknowi embroidery you can also find crochet edging to enhance its beauty. Authentic chikankari during Mughal period had calligraphy done using applique work.


Chikankari with applique work


                    This above picture really does not justify the work beauty. This chikankari embroidered salwar suit , i bought it long back to know more about its applique work, jali work, stitches in chikankari. Observe above picture, outside of each motif applique work is done, with same base fabric. The entire suit is done in this similar way.


Crochet edging


                   As you can see in above picture, small length of crochet edging has been done. Crochet edging may be done at the bottom side of salwar, towards the ending of sleeves, around waistline etc.


            In this post lets try very common but highly skilled applique work in chikankari.


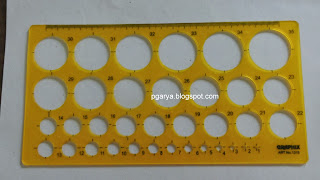
Circled stencil


                   Now a days we get various types of stencil in market, try to get above one or you can even use compass.


Applique pattern


                 With the help of stencil or compass, above pattern has to be drawn.  First draw circles as shown in below picture and also mark four equal points as shown in the picture.


Circles


                   Observing below picture, try to match four point and draw one more circle


Applique pattern


                 Below is the finished pattern. In each circle , i have marked diagonal lines. These line has to be cut.


Applique pattern


                         Transfer the pattern on the fabric. To do this pattern, you need two layers of same fabric. For first time trial, do on cotton fabric with big circles.


Applique pattern


                      Now cut diagonal lines as shown in pattern.


Applique pattern


                  After cutting diagonal lines, you need to cut further, perpendicular to diagonal line, as shown in below picture. This is done to avoid wrinkles and helps to get accurate shape.


Applique pattern


                     Fold back each cut shape and hem it to base layer. This is the reason , i said we need two layers of fabric. Well this is very skilled work, by the end of this pattern, one can learn his/her own technique to do this properly.


Applique pattern


Applique work in chikankari


                       Have a look at finished applique work. In each circle you can see a diamond shape area, this area can be embroidered and it has to be done before you do applique work. You can do embroidery soon after transferring the pattern on fabric, once embroidery is done, then start with applique work.  So here i have just done keel stitch.


            Application of this applique pattern, how to use this pattern? In above picture you saw i used only four circles and did this pattern, so this can be used as a panel on cushion cover instead of doing whole front side of cushion. To do the same pattern on salwar, there are many ways like, only till waistline this pattern can be done, or if salwar is stitched in princesses cut style, this pattern can be done in center panel. Or only sleeves can be done leaving whole body part of salwar plain. It can also be done on whole blouse. For all these only thing you need is, have loads and loads of patience. Try it , you will love it !!!!!

Popular Post